How to Build a Campfire [The Ultimate Guide]

The Campfire is the cornerstone of any good camping trip. The soft glow and ambiance of the flames, the radiant warmth it provides, the magical sound of the fire slowly breaking the wood down into ash - there’s nothing more quintessential to the camping experience than a good old fashioned campfire!
If you’ve never built a campfire before, or even if you just want to improve your technique, this step-by-step guide is sure to be helpful. You’ll learn how to build a campfire like a seasoned pro, including the best type of campfire to build for every situation, how to setup a campfire for cooking, ways to reduce and avoid campfire smoke, plus a ton of tips and gear that’ll make building a campfire easier during your next outdoor adventure.
Step 1: Check Local Campfire Restrictions
Before you start your camping trip be sure to first check if campfires are permitted in the area you’ll be camping.
Fire bans are an increasingly common occurrence, especially in the western U.S., and can be issued by either federal, state, county, or city governing bodies. Campfires can also be restricted above certain elevations, near certain bodies of water, or even due to protected geological features. This can make finding accurate restriction information a bit tedious.

Often, there will be warning signs and fire restriction information bulletins when entering a designated campsite or public dispersed camping area - but not always. We’ve found the easiest way to get up-to-date accurate info is to call the local ranger station (where applicable) or fire marshall, and ask about any fire restrictions or guidelines for the area where you’ll be camping.
If you can’t find a ranger station or fire marshall contact number and there’s no information on restrictions readily available online, contact the specific agency that manages the area where you intend to camp - whether that’s a National Park, National Forest, BLM, WMA, etc. - and have them confirm if a campfire is permitted.
Unfortunately, there is not a very cohesive resource for national fire restriction information online. But here are some resources to check for current fire weather conditions, restrictions, and wildfire conditions before planning your camping trip:
USFS Fire Restrictions [these are the Western USFS regions that see the highest number of wildfires]
National Interagency Coordination Center - Predictive Services
Step 2: Practice General Campfire Safety
As Smokey says, “Only YOU can prevent Forest Fires!” Use these simple campfire building and management steps to do your part and reduce the risk of your campfire getting out of control.
Only build a campfire when and where it’s permitted - e.g., there are no current fire restrictions in the area you’re camping [see above], and you’re building your campfire in an appropriate location - such as an established fire ring
Have plenty of water on hand (prior to lighting the fire) to quickly drown the fire - a campfire can get out of control VERY quickly, and you likely won’t be able to fetch water quick enough when needed. It’s also a good idea to keep an emergency fire extinguisher in reach too.
NEVER leave a campfire unattended - once your campfire is lit, someone needs to remain close by at all times to actively manage any issues that may arise.
If it’s windy, either forgo building a campfire altogether or keep it tamped down very low - burning ash embers and sparks can be carried aloft by even a slight wind and, under the right conditions, have the potential to ignite a fire up to a mile away.
Extinguish your campfire COMPLETELY before you break camp or go to bed - embers buried in the ash of your presumably “burned out” campfire can be reignited by a good gust of wind. To properly extinguish your campfire
First, drown it with water
Next, use a long stick or metal shovel to move the ashes around
Finally, keep pouring water onto the ashes until no sparks remain and it is cool to the touch
By following these steps before you leave or hit the hay, you can rest easy knowing your campfire won’t inadvertently burn thousands of acres or even hundreds of thousands of acres to the ground.
*(This post contains affiliate links. This means we may receive a small commission, at no additional cost to you, if you make a purchase through a link. See our full disclosure.)
Step 3: Choose Where to Build a Campfire
Developed Campfire Rings
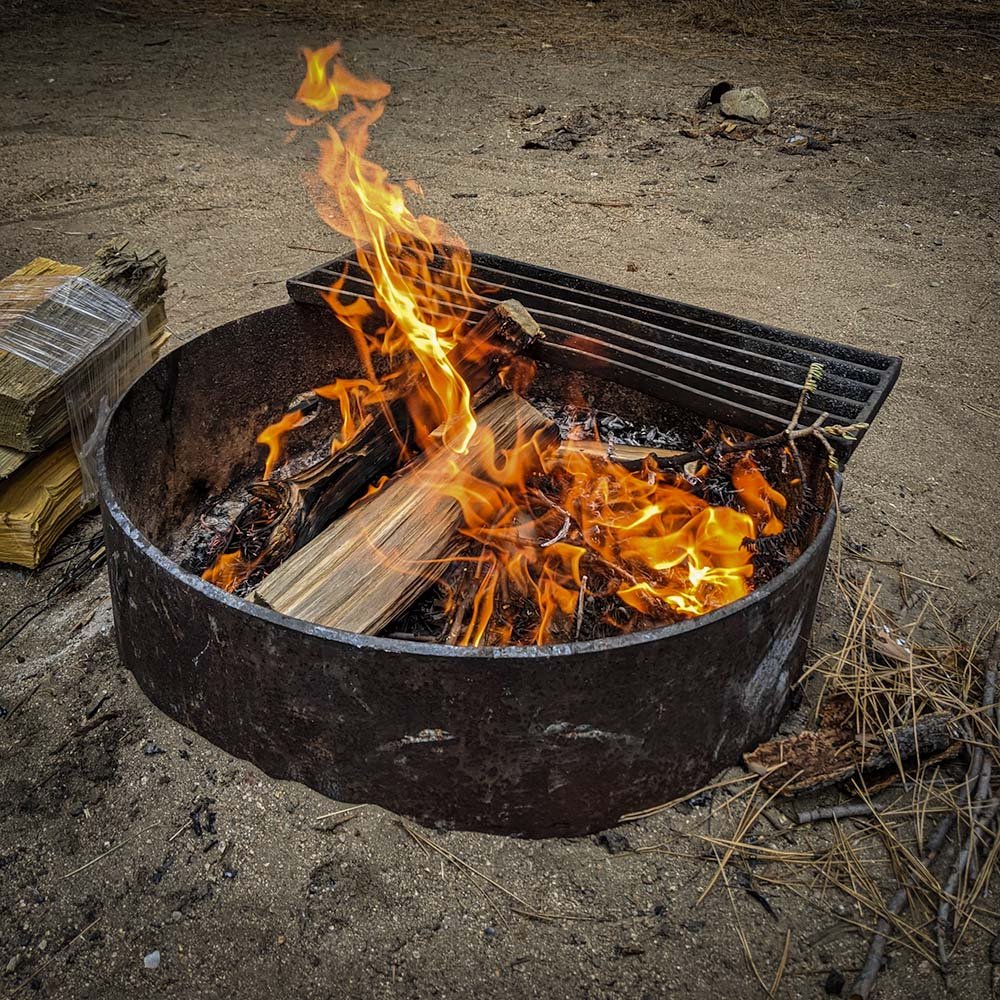
Most developed campgrounds and some fee-based primitive campsites will have a dedicated fire ring - typically metal, brick, or concrete - to provide a safe location to build a campfire. These developed campfire rings come in a variety of designs, and some even include built-in adjustable cooking grates to make camp cooking easier!
Established Campfire Rings
In dispersed camping areas where fires are permitted, you should seek out a camping spot with an established fire ring. Often these stone or mounded-earth fire rings will be the only indicator of a previously used campsite in dispersed camping areas.
Even if you have to fix it up a bit, by reusing a pre-existing campfire ring you can avoid further damaging or otherwise impacting the soil and local vegetation.
DIY Campfire Rings
If campfires are permitted but there are no existing campfire rings, you may need to make your own (provided it’s allowed by your campsite’s governing body):
Find a location - Ensure there are no rock ledges, tree limbs, or other types of vegetation overhead that could be impacted by the flame, smoke, or soot of the campfire. The ground should be hard compacted dirt, sand, rock, or gravel and would ideally be in a location that’s naturally sheltered from the prevailing wind and out of any obvious areas of seasonal water runoff.
Clear a Space - Clear the ground approximately 4-5 feet in diameter, free of any dry or flammable material.
Build or Setup the Campfire Ring - Here are three methods for constructing a campfire ring in order of least to greatest impact on the environment:
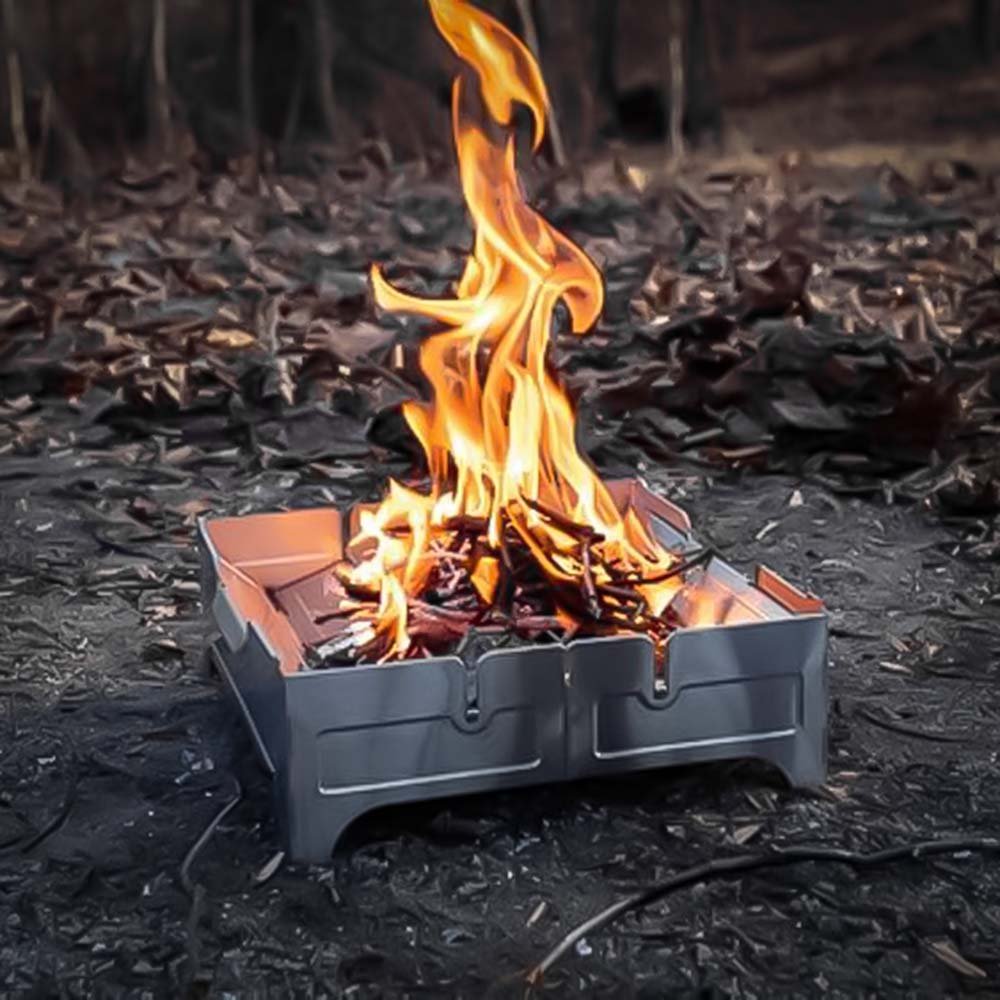
Portable Fire Pit - Portable fire pits are an awesome way to easily minimize your campfire’s impact on the environment by providing a convenient place to build a campfire, or, in the case of propane fire pits, literally leave no trace. You can learn all about them in our detailed guide on How To Choose the Best Portable Fire Pit for Camping.
Fire Pan - A dedicated firepan is a flat, boxed, or slightly concave steel pan on top of which a fire can be built to protect the soil below. An old steel cooking sheet, a (clean) metal oil drain pan, or the lid of an old charcoal barbeque grill are a few examples of makeshift fire pans.
Mound Fire - Use a shovel to break off mineral soil/dirt from (naturally occurring) uprooted tree roots into a mound approximately 6” tall by 24” in diameter atop a firecloth*, with a slight depression in the center in which to build your campfire. The mineral soil lacks organic material that can combust and will naturally protect the soil below. Once you’re done with your fire you can scatter the cold ashes and redistribute the mineral soil, leaving little to no trace of your campfire.
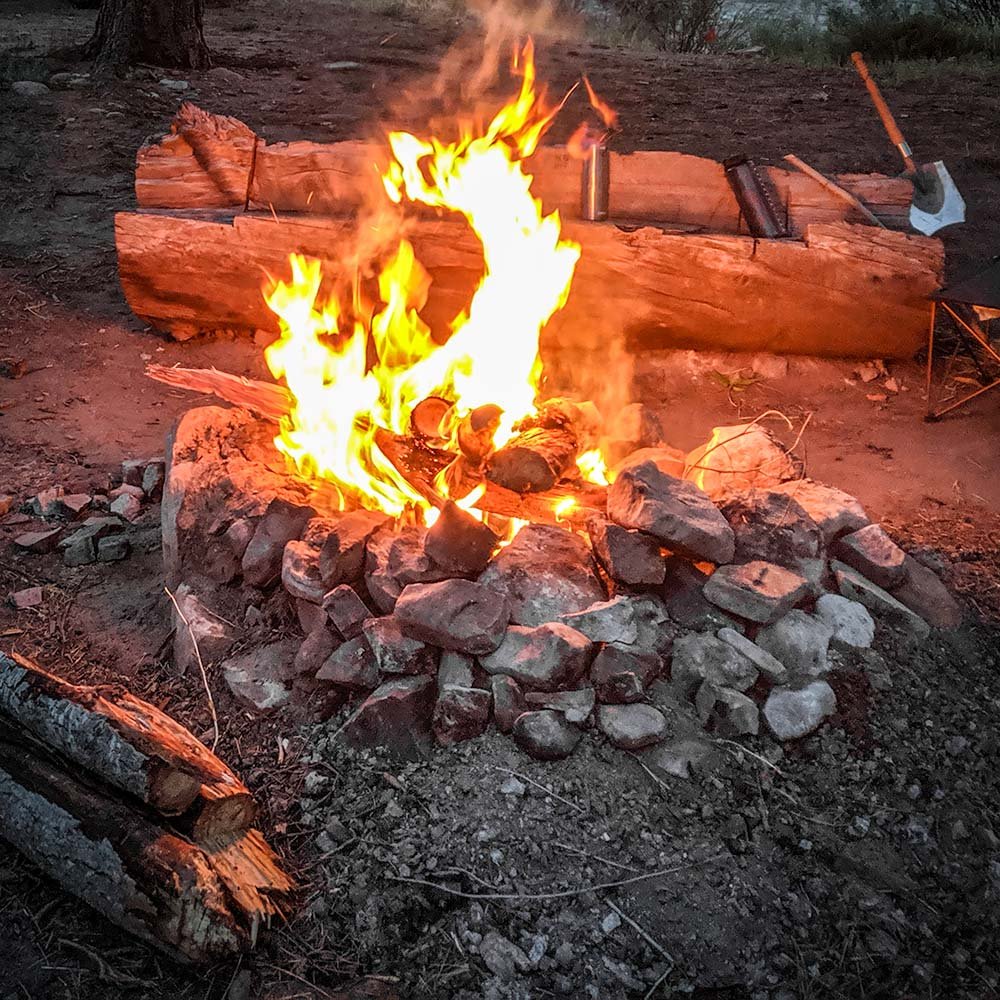
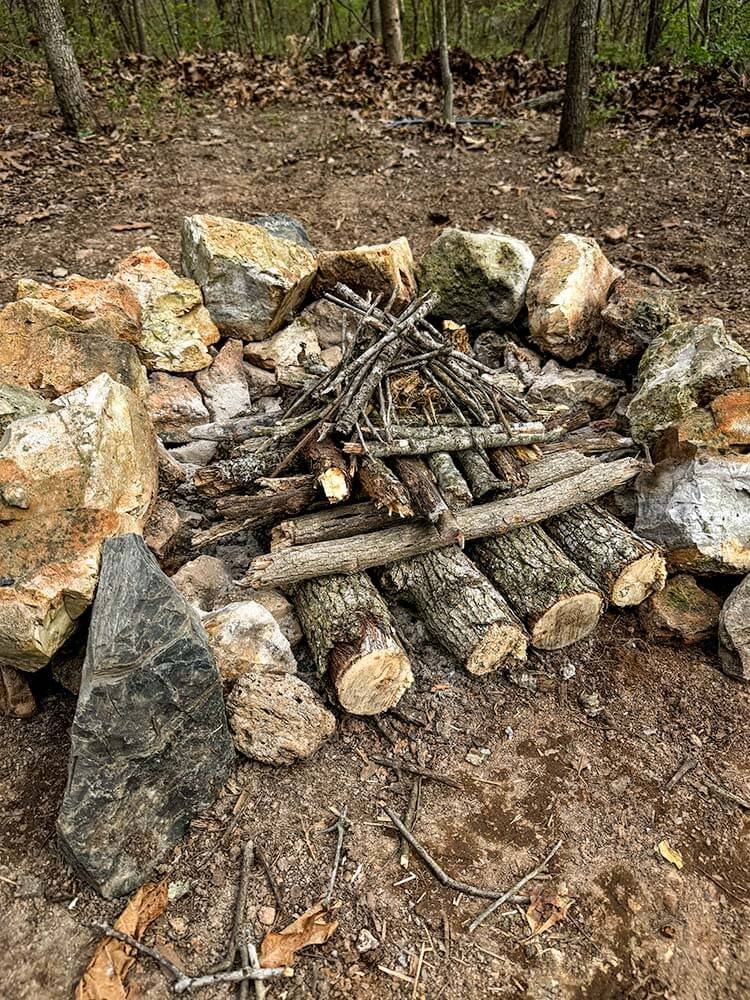
Stone Fire Ring - This is probably the most commonly used, though it’s also the highest impact of the DIY campfire ring options. Gather rocks from the surrounding area and construct a small retaining wall approximately 6-12 inches high encircling your cleared space. This rock perimeter will help keep the fire contained and protected from the wind. Once you’re done, your fire ring can be deconstructed, redistributing the stones and scattering the cooled ashes to minimize the impact on the terrain.
Pro Tip: We like to build our fire rings in a U-shape initially, this makes the tinder easier to access when lighting and leaves the option to expand it into a keyhole fire ring for cooking.
Step 4: Gather and Prepare Wood For Building a Campfire
There are three primary categories of wood that you’ll need to build a good campfire: tinder, kindling, and cord wood (firewood). Each is used in succession to allow the fire to progressively build heat, using increasingly larger and larger pieces of wood until the fire is burning efficiently at the size and heat you need.
If wood gathering is permitted in the area you’re camping in, we recommend using the Leave No Trace 4D’s of ethical wood collection by only gathering wood that’s:
Down (on the ground)
Dead (non-living limbs or trees)
Dinky (small)
Distant (far away from established campsites)

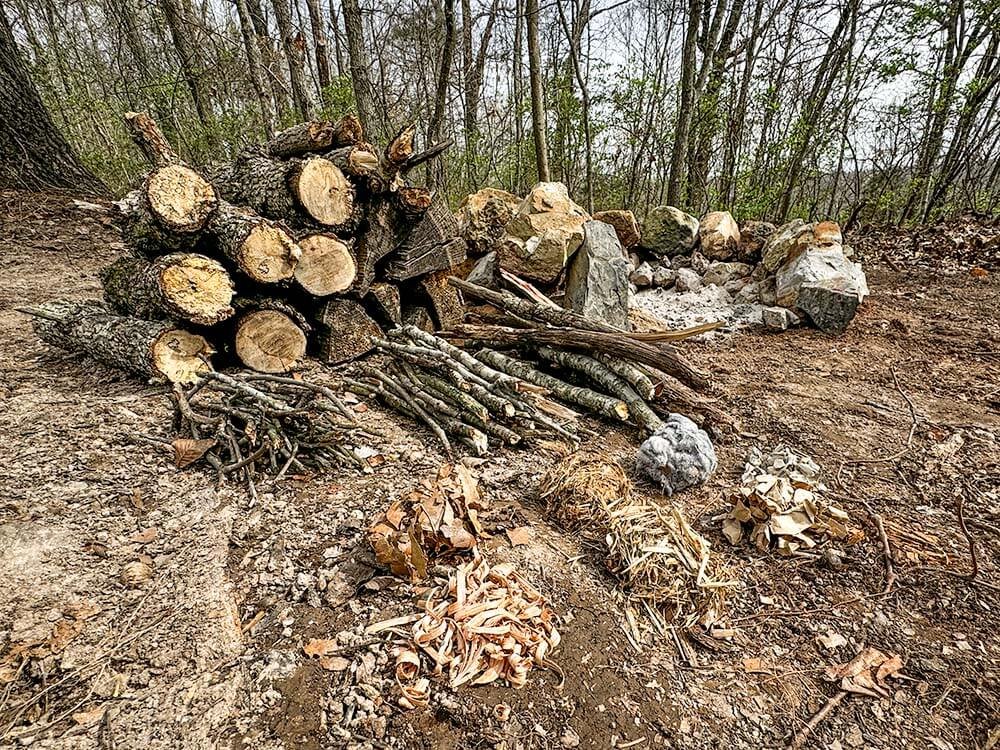
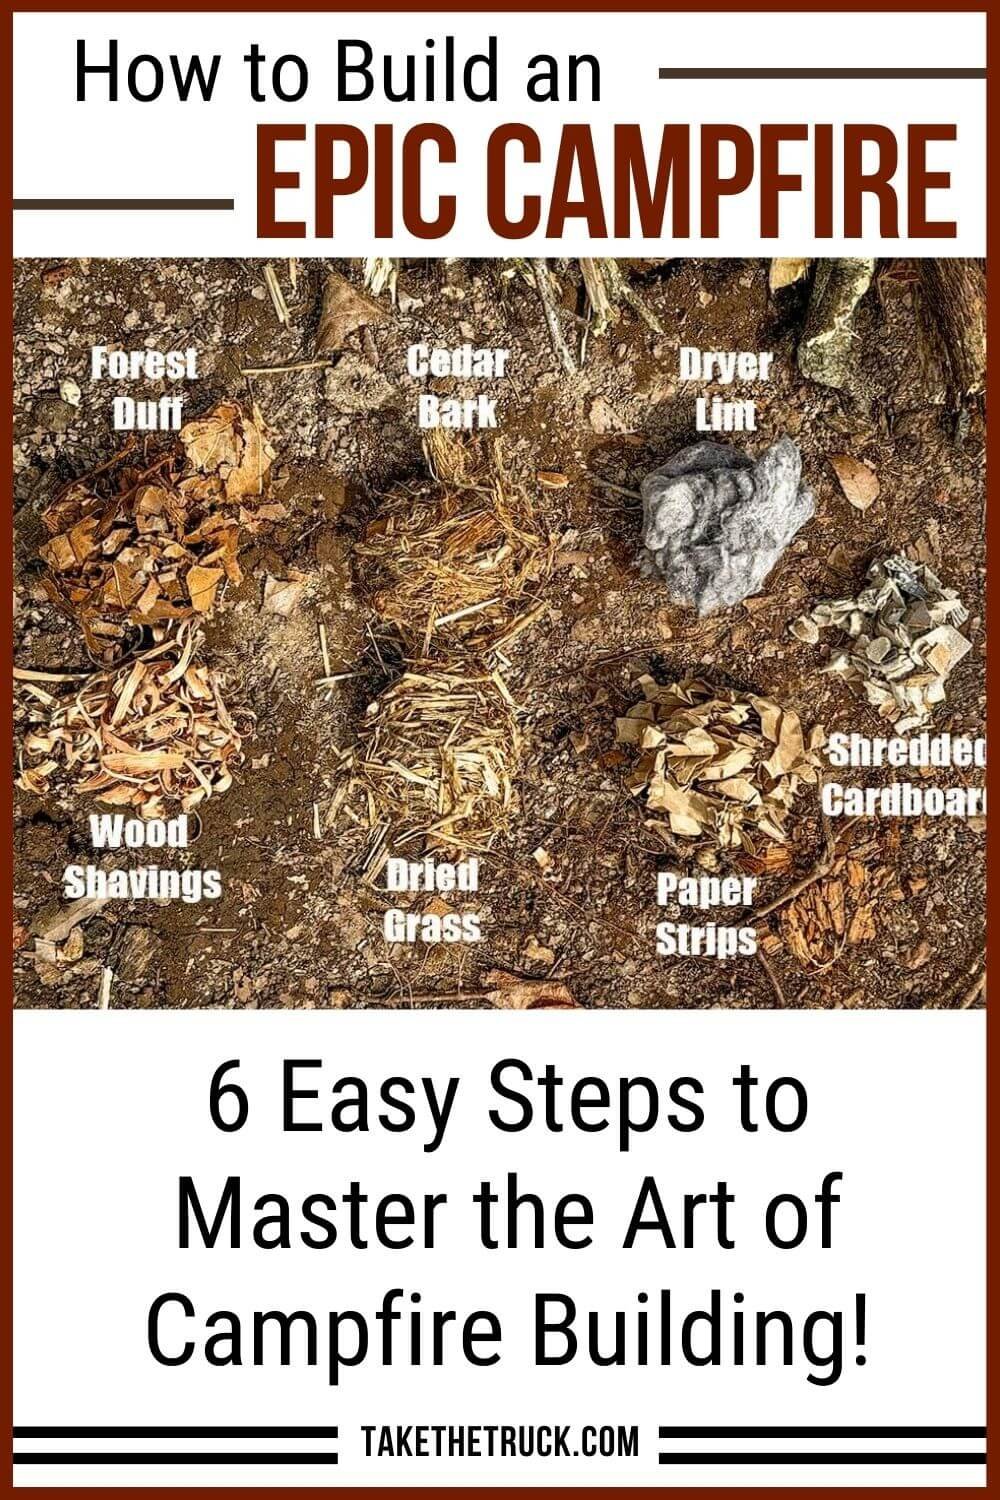
Tinder
Tinder is the smallest category of combustible wood or fibrous material, used in the initial lighting of the campfire; it should be very dry and ignite easily. Some examples of common tinder materials would be:
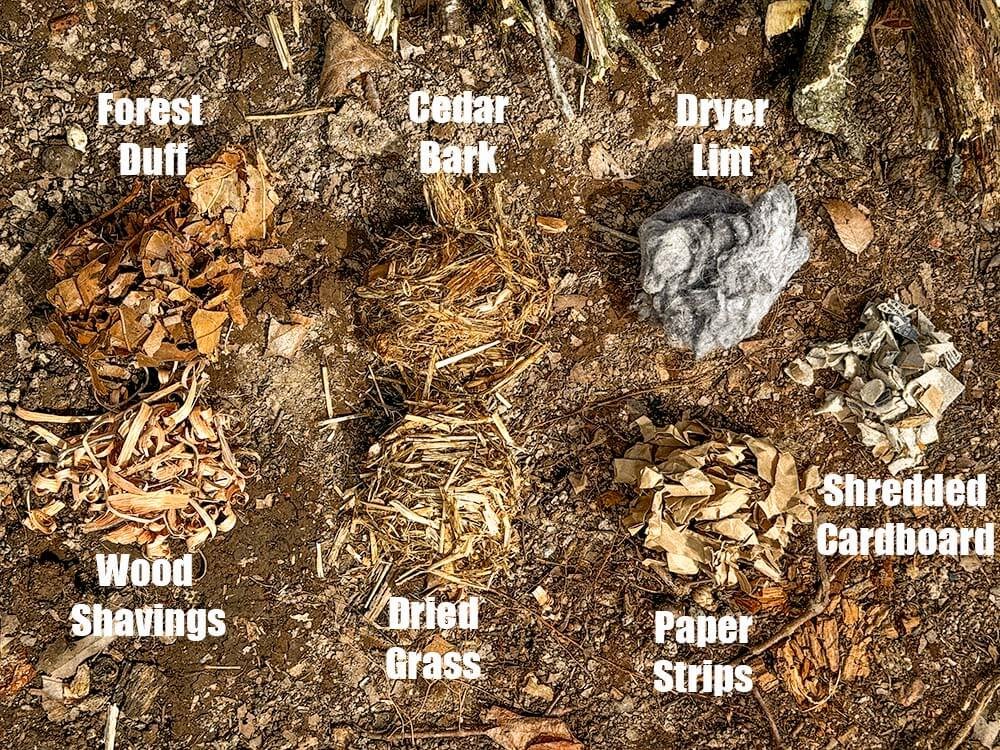
Natural Tinder Materials
Wood shavings, sawdust, or a feather stick
Forest duff - dead (dry) grasses, moss, or leaves (crushed and balled up)
Fibrous tree bark (shedding cedar or birch bark)
Secondary (Man-made) Tinder Materials
Shredded pieces of paper (e.g., old newspaper)
Cardboard shredded or torn into thin strips
Dryer lint
Store-bought fire starters*, fire sticks*, or fire logs*
Naturally occuring tinder is usually pretty easy to gather (if permitted) from around your campsite unless it has rained recently, in which case you can make your own tinder from your larger cord wood or kindling by removing small thin wood shavings with your pocket knife or hatchet until you have a pile sufficient to start your campfire. Alternatively, you can use one of the secondary tinder sources such as paper, cardboard, or commercial firestarters - or a combination of both.
Kindling
Kindling is a broad category of material that’s larger than tinder but smaller than cord wood and consists of things like twigs, sticks, small split pieces of cord wood, or small limbs up to approximately 1-2” in diameter.
You want a wide enough variety of kindling sizes on hand to be able to easily advance your fire from the initial ignition of your tinder, slowly and successively increasing the size gradation of the kindling you're adding, until the fire is hot enough to add larger cord wood.
Rushing this process and/or using an insufficient amount of kindling are the two most common ways campfires fail to light successfully. Take your time and make sure you have plenty of kindling to create enough heat and embers to get full-size cord wood to reach its flash point - which is approximately 550-650 degrees Fahrenheit….or, really bloody hot!
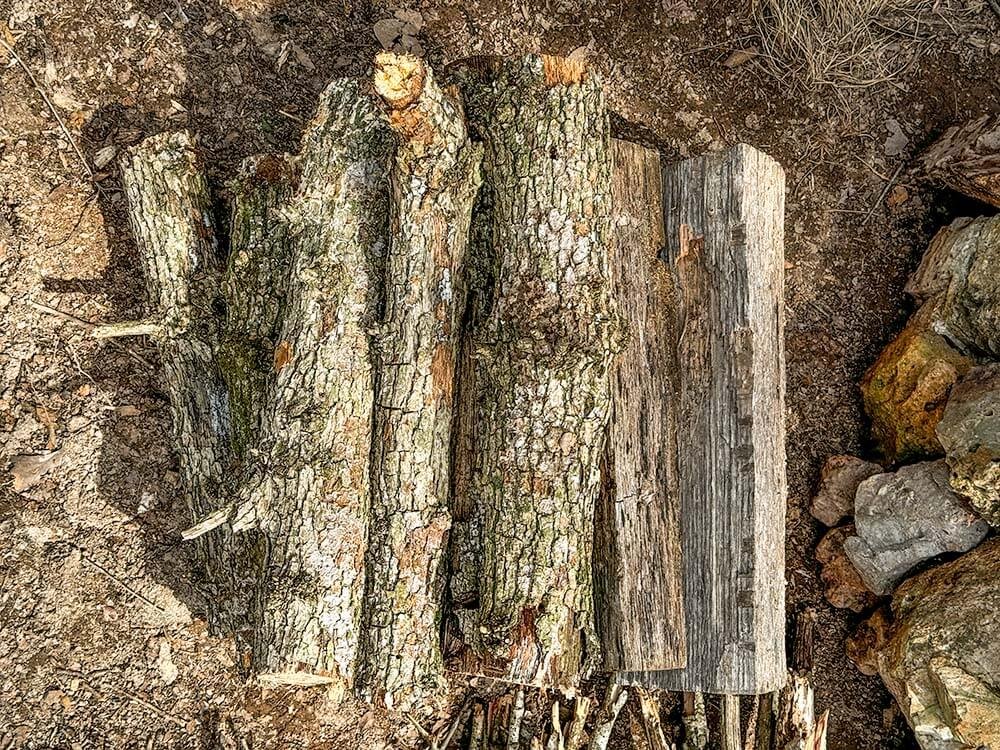
Firewood (a.k.a. Cord Wood)
Cord wood (or Firewood) will be the final category of wood you’ll need on hand once your campfire is burning sufficiently, having worked your way up from tinder to the larger kindling sizes.
Sizing
Cord wood will be the bulk fuel source used to keep your campfire burning, and consists of either split or whole round logs cut to approximately forearm length.
Small pieces will reach their flash point faster but will burn up quickly, while larger pieces of cord wood will take longer to reach their flash point but will burn much longer; we recommend having a 60/40 mix of each on hand for sustaining a healthy campfire.
Prep
Split wood will burn more readily than whole logs because there’s more surface area exposed, and tree bark is naturally fire resistant.
Types of Firewood
While you won’t always have a choice on the source of your firewood, you do want your cord wood to be as dry (seasoned) as possible. If you DO have a choice, hardwoods such as oak, maple, birch, beech, alder, or poplar will burn longer, hotter, and cleaner than softwoods such as fir, pine, spruce, or cedar.
Step 5: Choose a Method for Building Your Campfire
While there’s no universally “correct” way to build a campfire, there are a number of tried and tested campfire building methods that will work better than just winging it.
Each of the methods we describe below have pros and cons depending on your location, intention, and the weather in which you’ll be building your campfire. But whichever campfire method you go with, adequate preparation of your tinder, kindling, and firewood will give you the best shot at a successful campfire building experience.
Teepee Campfire
Probably the most common method for building a campfire is the Teepee method. The Teepee campfire is pretty fool-proof to construct, lights readily, and can be quickly scaled into a larger (or smaller) campfire. This is the method we personally use 99% of the time.

How to Build it:
Make a small pile of tinder in the center of the fire pit
Lean the smallest pieces of your kindling against each other around the tinder pile - in the shape of…a teepee 🙃…leaving an empty “doorway” to access the tinder for lighting
Progressively add additional larger and larger kindling layers around the initial teepee - being mindful not to block access to the tinder pile inside
Make one final teepee layer around the kindling teepee using smaller cord wood
Ignite the pile of tinder on the inside.
As the fire grows, and the teepee collapses in on itself continue to add cord wood in a similar pattern
Once the campfire is well established, you can simply add large cord wood as needed
Pros & Cons:
Pros:
Efficient and easy to light
Natural updraft
Self-protected from the wind
Scalable (easy to make the teepee larger or smaller as needed)
Self-drying (as inner wood burns, outer wood dries)
Cons:
Initial flame can get pretty tall (not ideal on a windy day)
Collapses more easily, requiring more maintenance
Burns faster than other methods
Log Cabin Campfire
The Log Cabin campfire method uses a square-stacked series of cord wood that resembles a log cabin. It creates a broad, low-maintenance campfire with a nice even coal bed that’s great for cooking over.

How to Build it:
Place two pieces of cord wood parallel to each other and centered in the fire ring
Set another pair perpendicular on top of the first
Repeat this pattern 1-2 more times until the “log cabin” is several layers tall
Place your tinder centered on the inside of the log cabin structure
Top with a hardy amount of kindling
Ignite the tinder (a long-neck barbeque lighter is best)
As the fire grows, and the cabin collapses in on itself continue to add cord wood in a similar pattern
Once the campfire is well established, you can simply add large cord wood as needed, abandoning the log cabin motif
Pros & Cons:
Pros:
Low Maintenance
Good ventilation (gaps between the cord wood logs)
Creates broad coal bed that’s easier to use for cooking
Cons:
Not Easily Scalable
Not self-drying
Requires more kindling (because the cordwood is not directly atop the flame)
Lean-To Campfire
The Lean-To campfire method is similar to the Teepee method, but uses the side of the fire ring to support the structure of the campfire (unlike a free-standing teepee fire). The main advantage of this campfire method is improved wind protection; by orienting the “roof” of the lean-to down wind it protects the initial ignition of the tinder and kindling underneath.

How to Build it:
Make a small pile of tinder just off the downwind edge of the fire ring
Pro Tip: If you do not have a high-sided fire ring, you can position a large piece of cord wood on the upwind side of the fire ring and build the lean-to against it (as shown in the image above)
Lean the smallest pieces of your kindling atop the tinder pile and against the edge of the campfire ring, leaving an empty “doorway” on either side to access the tinder for lighting
Progressively add additional larger and larger kindling layers on top of the lean-to structure, being mindful not to block access to the tinder pile underneath
Make one final layer using smaller cord wood
From the side, ignite the pile of tinder on the inside; using a longneck lighter makes this step easier
As the fire grows, and the lean-to collapses in on itself you can reposition the embers to the center of the fire ring and continue to add larger cord wood as needed
Pros & Cons:
Pros:
Great initial wind protection
Self-drying (as lower wood layers burn, upper wood layers dry)
Cons:
Not scalable, inevitably requires repositioning
More maintenance
Requires either a high-sided fire ring or relatively large piece of cord wood for structural support
Pyramid (Upside-Down) Campfire
The Pyramid campfire (also known as the upside-down campfire) method is comparable in structure to the log cabin method, but uses more concentrated layers of wood on each level and burns top down in a semi-self-feeding fashion.
How to Build it:
Lay a row of medium sized pieces of cord wood parallel to one another on the bottom of the fire ring
Place a second layer of smaller pieces of cord wood on top of the first in a perpendicular orientation
Continue this pattern of alternating the direction with each layer while decreasing the size of the wood with each layer
Once the structure is approximately 4-5 layers tall (the last of which should be mostly medium to small kindling), stack a hardy amount of tinder and your smallest kindling on the flat top of the “pyramid”
Ignite the tinder, adding additional small kindling as needed, and as the first upper layers burn, their hot embers will drop down, igniting the subsequent layers beneath
Pros & Cons:
Pros:
Low Maintenance (once established)
Slow Burning
Creates broad coal bed that’s easier to use for cooking
Cons:
High exposure to wind can make initial lighting difficult
Not self-drying (because heat rises and the fire is burning top down)
More initial maintenance - kindling must continue to be fed until the upper layers are burning well enough to create embers sufficient to ignite lower layers
Slow - if you’re needing fast heat, this is not your method
Star Campfire
This method of building a campfire is a great option to use when larger firewood is limited, or you need to make your cord wood last as long as possible.

How to Build it:
Build a small teepee campfire structure (as described previously above) in the center of your fire ring
Lay out 4 to 6 large pieces of cord wood around the teepee - in a cross (X) or star (✶) pattern - each with one end touching the teepee
Light the inner tinder of the teepee and add additional kindling or small cordwood to the center teepee as needed until the ends of the larger cord wood are burning well
As the cordwoods’ ends burn and a central bed of embers is established, you can push the cordwood inward towards the center to continue to fuel the fire
Pros & Cons:
Pros:
Low Maintenance (once established)
Slow Burning
Efficient use of firewood
Cons:
Not self-drying
More initial maintenance - kindling must continue to be fed until the ends of the larger cord wood reach their flashpoint
Slow and low - if you’re needing a fast fire or are looking for a lot of heat for warmth, this is not the campfire method to use
Step 6: How to Start A Campfire
There are a ton of ways to start a campfire, but some methods are definitely MUCH easier than others. Here are our top four methods for starting a campfire in order of difficulty.

Hot Spark (Primitive Fire Starting Methods)
If you’re wanting to channel your inner caveman or Bear Gryllis, starting a fire with a primitive fire starting technique can be a fun exercise.
Flint and steel kits* are a relatively easy way to produce enough spark to get your campfire tinder to ignite
A good magnifying glass* can also make an excellent emergency fire starter in a pinch
Starting a campfire with a bow-drill is an extremely gratifying process, albeit an incredibly tedious one.
However, while these primitive fire-starting methods might be handy to know for a survival situation, they’re not exactly practical when you’re out at a campground with your family (glaring at you wondering whether or not they’ll just be able to make their s'mores tonight 😅).
Matches
A great test for honing your campfire building skills is mastering the one-match-fire; essentially you must gather your tinder, kindling, cord wood, and assemble them in a way that ensures you can successfully start your fire with a solitary match. This is an especially fun way to teach kids how to build a campfire (I still have fond childhood memories of my brother and I competing with one another to see who could build a one-match campfire the fastest on family camping trips in the Ozarks).
Otherwise, you can use a book of matches or wooden matchsticks to light your fire. Just keep in mind that most matches will be ruined if wet and they can be a real struggle in windy conditions. Waterproof, wind-resistant matches* can help, but generally, matches are better used as a backup to other more reliable fire-starting methods.
Lighter
Using a lighter is probably the simplest, most common, way to start a campfire. We like the basic Bic lighters*, because they’re generally cheap, lightweight, reliable, fairly water resistant, last a LONG time, and are easy to replace when needed since basically every gas station and convenience store carries them. We also keep a Bic multi-purpose lighter* in our camp kitchen box for lighting our camping stove, and its long neck makes it super handy for starting campfires where the tinder may be more difficult to access with a traditional lighter.
Torch
If you have a propane camping stove that uses 1lb propane canisters, these small torch attachments* screw onto the top of the same propane fuel canisters and are extremely handy for starting a campfire, especially in windy or damp conditions.
Speaking of damp conditions….
Tips for Starting And Maintaining a Campfire in the Rain (or Other wet Conditions)
There’s no better time to enjoy a warm cozy campfire than when it’s cold and damp outside! But starting a campfire when the wood is damp or the ground is wet can be especially challenging, and often results in a sad, smoky, mildly smoldering campfire…no bueno! Here are some tips that’ll help:
How to Find Dry Tinder/Kindling
Look under trees, overhanging rock ledges, logs, or other places where the ground would have been sheltered from falling rain fordry fire starting materials. In a pinch, the inner bark fibers of coniferous trees can provide relatively dry kindling. It’s also a good idea to keep some dry tinder packed with your camping gear “for a rainy day.” Dryer lint packed in an old medicine bottle makes a great tinder kit for starting campfires.
Remove all the Bark from Your Firewood
Tree bark retains moisture and is naturally fire resistant, so by removing the bark from your firewood using a knife, ax, hatchet, or by hand (if it’s loosely attached), you’ll greatly improve its chances of burning well in the campfire, and you’ll reduce the amount of campfire smoke.
Split Your Kindling and Firewood
While the outside of your firewood may be damp, it’s probably still dry on the inside. So split your wood using your ax or hatchet to expose the drier inner sections of wood. These smaller and drier pieces of wood will burn more easily, so you may find you need more than you’d typically use.
Elevate Your Campfire
If the ground is very damp, or even covered in snow, you can build an elevated platform out of wrist-sized logs on which to build your fire. This will ensure your tinder does not wick the moisture from the ground below. Using a taller campfire configuration, such as The Teepee Method or Pyramid/Upside-Down method, is a great way to keep your campfire elevated off the wet terrain.
Light Your Fire Downwind
Note the direction of the prevailing wind and try to light your fire downwind (or leeward), so that the initial flames are blown towards your positioned kindling and firewood to help dry them as the fire continues to grow.
How to Dry Wet Firewood
Once your fire is established, lay any damp cord wood around the perimeter of your campfire, rotating it periodically, so it will dry as the fire burns. Shuffle in more damp wood as the dried cordwood is moved into the campfire to burn.
Building a Campfire For Cooking
Cooking over a campfire is a great way to add some fun to camp cooking [check out these 25 Easy One-Pot Camping Meals for some tasty dishes to try].

There are a few things to keep in mind to set yourself up for the best campfire cooking experience.
While some cooking can be done over the inconsistent heat of an open flame (think skewered hotdogs, roasting marshmallows, pie irons, foil packs), an even bed of hot embers will put off far less smoke and be much more effective for campfire cooking. Just keep in mind you’re going to need a decent amount of cord wood and about 45 minutes to an hour to get the fire burned down to embers and ready to cook over - so as the boy scouts say “be prepared!”
Build a fire that’s hot enough to thoroughly ignite multiple larger pieces of cord wood - the Log Cabin campfire method described above is a great option.
Keep the fire burning steadily until the wood has started to break apart and turn mostly into coals and embers.
Using a long stick or metal shovel, push the remaining larger burning logs to one side of the firepit
Next, adjust the embers to the other side of the fire pit. This bed of hot embers will serve as your “cooking side”, while the side with burning logs will serve to continually replenish your cooking embers
As the logs burn and break down into embers, redistribute the embers to the cooking side and replace with fresh cord wood as needed
If you’re camping in an area that has limited access to firewood (or very pricey camp-host-supplied firewood) - or if you’re wanting to save time - using some store bought charcoal briquettes can be a great alternative and will mimic the campfire cooking experience with a far shorter preptime. Picking up a nice cast iron camping set and a stainless steel cooking grate* will also make cooking over your campfire much easier.
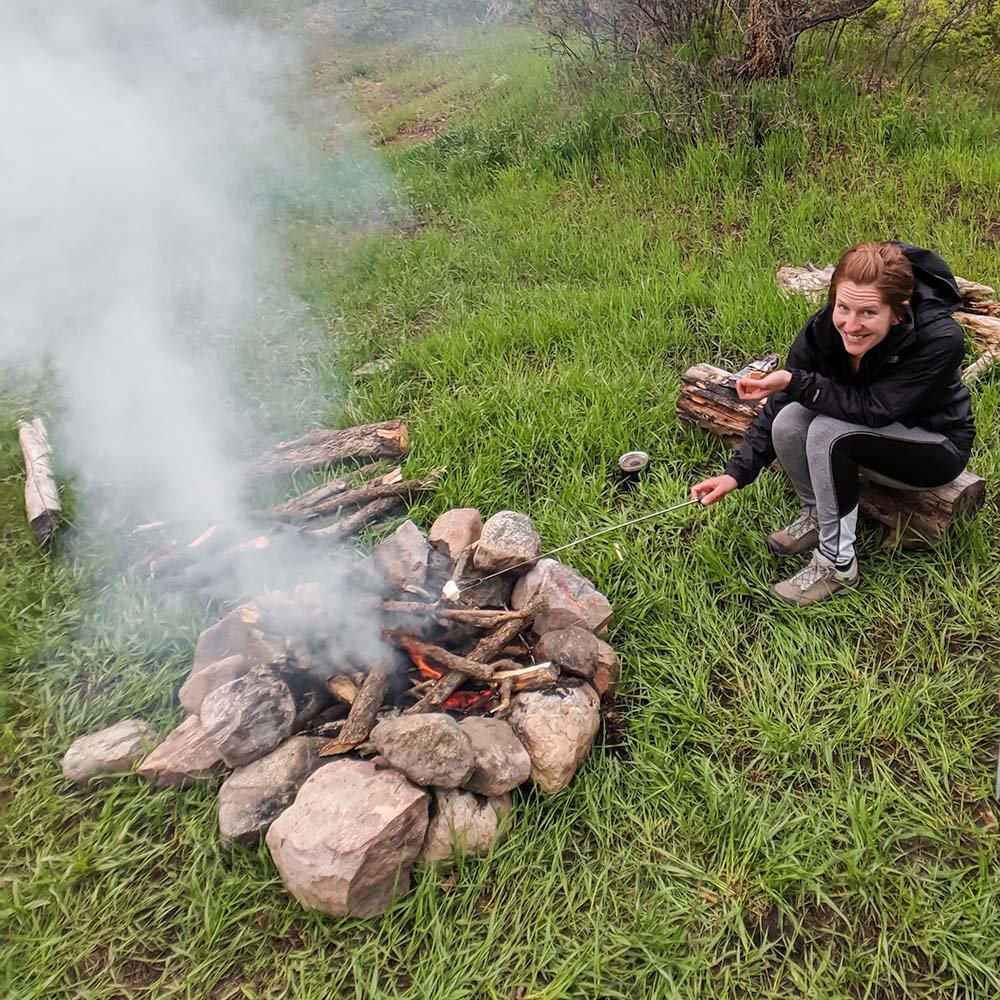
How To Reduce and Avoid Campfire Smoke
Campfire smoke can be a real pain in the arse; it gets in your eyes, stinks up your clothes, isn’t great for your lungs, and if you happen to be the prettiest camper around the campfire it will follow you incessantly 😆. Here are a few tricks we’ve learned that’ll help make your campfire as smoke-free as possible:
Put Your Camp Chairs Upwind of the Fire
Contrary to popular belief, the smoke doesn’t follow the prettiest camper, it follows the wind. So note the prevailing wind direction and (re)arrange your camp chairs in a semi-circle upwind from the fire.
Only Burn Thoroughly Dried Hardwood
Properly dried hardwoods, such as maple, oak, ash, and birch produce the least amount of campfire smoke. Avoid making cord wood from soft coniferous trees like fir, pine, spruce and cedar, and avoid using things like bark, leaves, pinecones, damp twigs, sage brush, etc. for tinder or kindling.
Keep it HOT!
If your campfire is not burning hot enough for the type or size of cord wood you prepared, it will start to smoke and smolder. So keep the fire burning good and hot, supplementing with extra kindling, until there’s a sufficient bed of embers to keep the heat sustained and the smoke to a minimum.
If you want to truly avoid campfire smoke you may want to look into a smokeless portable propane fire pit. Check out or post on How To Choose the Best Portable Fire Pit for Camping for some of the best options!
Best Campfire Accessories
You don’t need a ton of gear to make a good campfire, but there are a few tools and campfire accessories that make the process and experience a bit easier, and a little more enjoyable. Here are our favorites:
Quality Hatchet and/or Axe
These German hand-made Helko Hatchets* and Axes* are heirloom quality tools you can pass down to your children and grandchildren.
Folding Camp Saw
We love our Agawa Canyon Boreal 21* folding saw, in fact we think it’s The Best Folding Camp Saw out there. We’ve used it every one of our caming trips and it’s never skipped a beat.
The easy-button of campfire building - these will make getting your campfire started a breeze
A lifesaver when tinder is either unavailable or too damp to gather.
While they’re not fire-proof, a good pair of fire resistant gloves will help avoid inadvertently burning your hands when building a fire
These are an awesome way to help stoke the embers while starting your campfire, without having to get your face and hair close to the fire and covered in smoke
A Comfy Campchair
You’ll need a comfy place to sit and admire your campfire craftsmanship! So check out our review of The 15 Best Camping Chairs for help picking one that’s right for you.
Portable Fire Pit
Check out our guide on How To Choose the Best Portable Fire Pit for Camping for a ton of great ways to simplify your campfire setup
Fire Blanket/Mat* - this is a great way to protect the ground when using a portable campfire pit or building a leave-no-trace campfire ring

A good campfire draws us closer together - for warmth, a hot meal, or a good conversation - and we hope this guide helps you build campfires that you can gather around with your friends, family, or even a stranger or two and forge some life-long memories.
Be sure to SUBSCRIBE to our bi-monthly blog updates for more helpful camping, overlanding, and family travel tips and guides!
Related Links:
The Best Cast Iron Set for Camping [And How to Use It Like a Pro]
Camping Bathroom: A Camper’s Guide to Catholes, Wag Bags, & Camping Toilets
Save to Pinterest!
We’d Really Appreciate a Share on Social Media!👇